Mechanical surface preparation: profiling, edges and contaminant control
A resinous floor is only as good as the concrete surface it is bonded to, and that surface is not what the slab looked like when it was poured. It is what the slab looks like after mechanical preparation. In every Grand Prairie, Arlington and Mansfield garage we help spec, from the TX-360 corridor across to US-67, the preparation stage is where the outcome is decided — long before the first coat of primer is mixed. This is written for homeowners around Grand Prairie, TX who are looking into concrete surface preparation and want the honest version rather than a sales page.
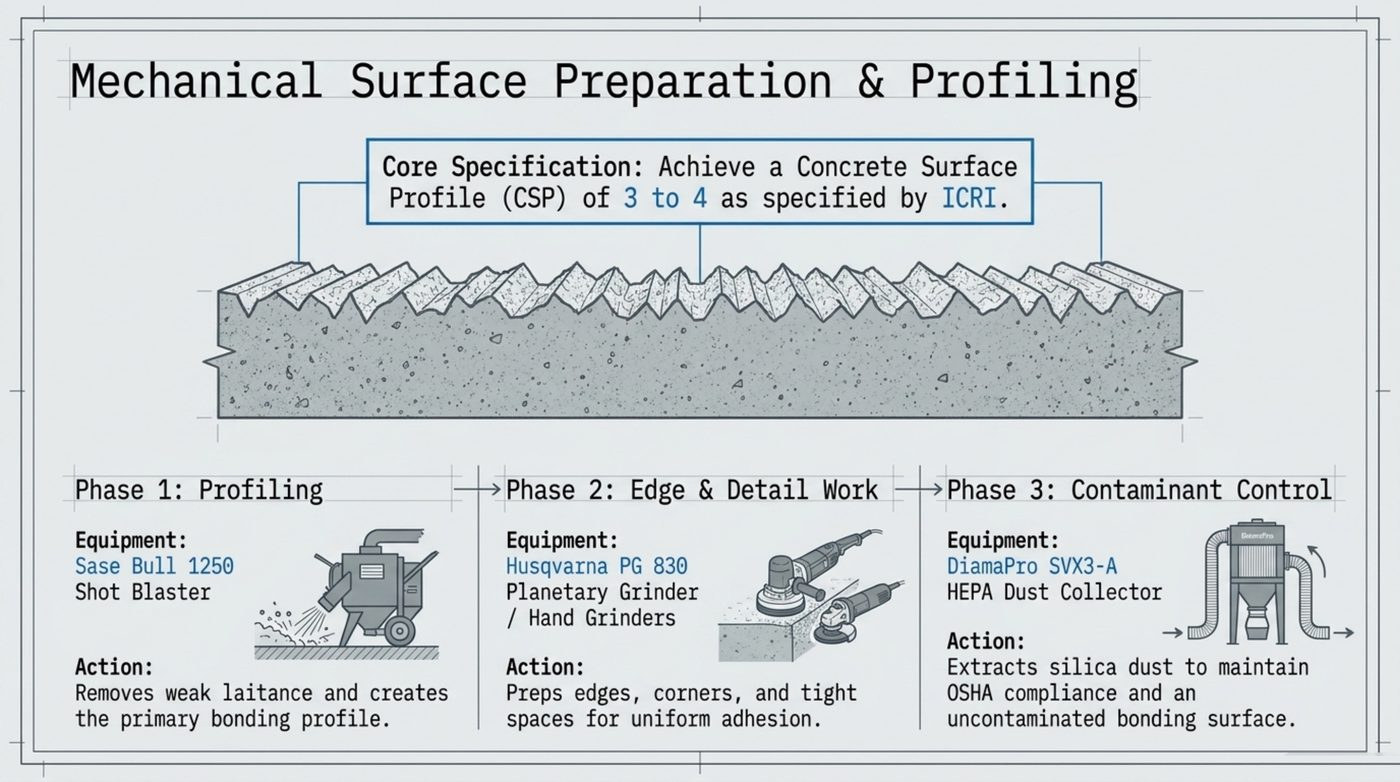
The core specification is simple to state and demanding to hit: achieve a Concrete Surface Profile, or CSP, of 3 to 4 as defined by ICRI. That profile is a measurable degree of roughness, not a visual impression. A slab at CSP 1 or 2 is too smooth for a heavy-duty broadcast system; the film may sit on the surface and look fine, then release under traffic or thermal movement.
The short version
- Laitance is the thin cement-rich layer that rises to the top of a slab as it cures, looks like concrete and behaves like chalk, and is the most common cause of a floor peeling in one large sheet.
- Phase one uses a walk-behind shot blaster to fracture away laitance and the top fraction of slab, recovering spent media and dust in the same pass.
- Phase two handles the last six to twelve inches against a stem wall, drain recesses and post bases with planetary and hand grinders, and it is the phase rushed jobs skip.
- Phase three extracts crystalline silica dust at the source with a HEPA collector connected to the cutting equipment, keeping the work area within OSHA compliance.
- CSP 3 to 4 is rough enough to key a 38 to 40 mil broadcast system and fine enough for the primer to wet out completely, while a CSP 1 or 2 slab is too smooth.
Hitting CSP 3 to 4 across an entire floor takes three distinct phases of work, and they are usually done by three different pieces of equipment for good reason. Profiling a wide open slab, dressing the edges against a stem wall, and keeping the air clean while both happen are separate problems that need separate solutions.
Phase 1: profiling the field
The first phase is about removing weak laitance and opening the concrete so resin has something to grab. Laitance is the thin, cement-rich layer that rises to the top of a slab as it cures. It looks like concrete and behaves like chalk. Anything applied over it is bonded to powder, which is the single most common cause of a floor that peels in one large sheet.
This work is done with a walk-behind shot blaster. The machine throws steel shot at the surface, fractures away the laitance and the top fraction of the slab, and recovers the spent media and dust in the same pass. The result is a uniformly abraded surface with the open, angular profile that the specification calls for — CSP 3 to 4 under ICRI.
Shot blasting is preferred over acid etching for this class of floor because it is predictable. Etching depends on how the acid reacts with that particular pour, which varies between a Duncanville slab and a Midlothian slab. A shot blaster produces the same profile on the same machine settings, and it leaves a surface that can be tested before anything is broadcast into it.
Phase 2: edges, corners and detail work
A shot blaster cannot reach the last six to twelve inches against a stem wall, inside a floor drain recess, or around a post base. Those areas are where garage floors in North Texas most often fail, because the perimeter is exactly where expansive clay movement and brine-laden runoff concentrate.
Edge and detail work is done with a planetary grinder for open but narrow areas and hand grinders for the tight spots, corners and the base of walls. The goal is the same CSP 3 to 4 profile, just achieved with different tooling. Anywhere the field equipment could not reach has to be brought to the same standard by hand, and that includes the apron at the garage door and any control joints that will be treated.
This is the phase that gets skipped on rushed jobs, and it is the phase you can check afterward. If the perimeter of a finished floor feels noticeably smoother than the middle, or if edge coating lifts before the field does, the detail work was not done to spec.
Phase 3: contaminant control
Grinding and blasting concrete produces crystalline silica dust, which is a serious respiratory hazard and a regulated one. The third phase exists to extract that dust at the source, using a HEPA dust collector connected directly to the cutting equipment. This keeps the work area within OSHA compliance and keeps the operator out of the dust cloud.
Contaminant control also covers what comes out of the concrete rather than what comes off it. Oils, grease drips from parking spots, and tire dressings all sit in the top fraction of the slab, and mechanical preparation removes them along with the laitance. Where absorbent contamination has soaked deeper, the affected area is treated or the bond relies on the open profile of the surrounding concrete.
| Phase | Equipment | Action | Result |
|---|---|---|---|
| Phase 1: profiling | Walk-behind shot blaster | Removes weak laitance and creates the primary bonding profile | CSP 3 to 4 across the field |
| Phase 2: edge and detail | Planetary grinder and hand grinders | Preps edges, corners and tight spaces the field machine cannot reach | Uniform adhesion to the perimeter |
| Phase 3: contaminant control | HEPA dust collector | Extracts silica dust at the source during cutting | OSHA-compliant, uncontaminated bonding surface |
Run as a sequence, the three phases produce a surface that is rough enough to hold a heavy broadcast system, uniformly prepared to the same standard everywhere, and clean enough that the first coat of resin is bonding to concrete instead of to dust.
Why CSP 3 to 4 is the right target
Profile depth controls how much mechanical grip the film has. Too smooth and the system depends on chemical adhesion alone, which is unforgiving on a slab that has any moisture or thermal movement. Too rough and the resin cannot fill the profile, which traps air under the film and produces pinholes and bond failures of a different kind.
CSP 3 to 4 is the band developed for heavy-duty resinous systems on concrete that will see vehicle traffic, chemical exposure and heat cycling. It is rough enough to key a 38 to 40 mil broadcast system into the surface, and fine enough that the primer wets it out completely. A garage in Grand Prairie that sits through hail season, ice-storm brine and summer pavement above 140°F needs the top of that band rather than the bottom.
Frequently asked questions about mechanical surface preparation
Can you acid etch instead of mechanically preparing the slab?
Not for a double-broadcast system. Acid etching is difficult to control and hard to verify, and it does not reliably reach CSP 3 to 4. Mechanical profiling produces a measurable, repeatable surface that can be inspected before the first coat goes down.
How do I know my contractor actually hit the specified profile?
Ask what equipment was used and how the profile was checked. A shot blaster with dust collection, planetary grinders at the edges and hand grinders in the corners is the expected method. You can also compare the texture at the perimeter against the middle of the floor once it is finished — they should be prepared to the same standard.
Does silica dust control matter on a residential garage job?
Yes. Grinding and blasting concrete releases crystalline silica, and HEPA extraction at the tool is what keeps the work area compliant and the air in your Grand Prairie or Cedar Hill garage safe. It is part of the specified method, not an optional extra.
If your quotes do not mention how the slab will be profiled, you have not yet found the right provider. Grand Prairie Epoxy Floors helps homeowners in Grand Prairie, Arlington, Irving, Mansfield, Duncanville and Midlothian compare local installers who prepare to CSP 3 to 4 with controlled dust — call (972) 850-7986, run the pre-installation checklist, or start from the garage floor epoxy overview.